Installing Your Antenna
The easy way is, of course, to pay an installer to do all
the hard work for you. But providing you already have the tools for the job
and are prepared to set aside a few hours, then you can have an educative
and enjoyable experience doing the work yourself, and have the satisfaction
of knowing that the job has been done properly.
Time is the one thing that the professional installer does
not have in abundance. A professional installer does not like to spend too
much time setting up your system, he would much prefer to be elsewhere on
another job earning more money. It takes time to get your system tracking
the arc accurately. Providing you have the time, and understand how to set
up your antenna system correctly, you are likely to beat any professional
installation for accuracy in tracking the arc.
Do I need a meter?
It is perfectly possible to install and align a motorised
satellite dish without using a meter. A meter can help when peaking the elevation/declination
of a dish, and it is quick to respond to small adjustments.
A meter can help you save time, that's why installers use
them, but they are not essential, indeed blind faith in a meter can
lead you well off course.
All a simple meter can do is help you maximise the energy
that your lnb sends down the signal lead, it cannot tell one satellite from
another, or even tell the difference between a satellite and the sun, or a
nearby radar transmitter. All it does is measure the sum of all the signal,
noise and interference signals generated by the lnb. You should always confirm
the results of a simple meter test with what you can actually see on your
television screen, and the reading on your receiver's signal quality meter.
Do not be obsessed with the absolute value of the signal quality percentage
shown on the TV display
Many satellites still carry some analogue programming. An
old analogue receiver will never crash or lock-up on you, and is quick to
respond to changes in signal quality. It is far easier to optimise reception
on an analogue channel, so if you still happen to have an old analogue receiver
hanging around don't be afraid to use it to peak up your installation.
The installation process
All of the hints and tips shown below should be read in conjunction
with the guide supplied with your antenna mount or motor. This guide is intended
to explain the theory behind setting your equipment up and to help you diagnose
and correct any problems you may encounter with it, not to explain where all
the adjustment points are on your particular dish, mount or motor.
Here's what you need to do.
1. Ensure the mounting
bracket or pole is absolutely vertical. Check that it does not lean left-to-right
or front-to-back. Check this using a spirit level, or a plumb line, measuring
in at least two positions at right angles to each other. Re-check this after
you have tightened the bolts up too.
If the bracket or pole is not vertical, no subsequent adjustment can
ever put this right.
2. After you have
attached your mount or motor to your pole or bracket, and with the bolts just
nipped up a little, slide the whole assembly around the pole until the unit
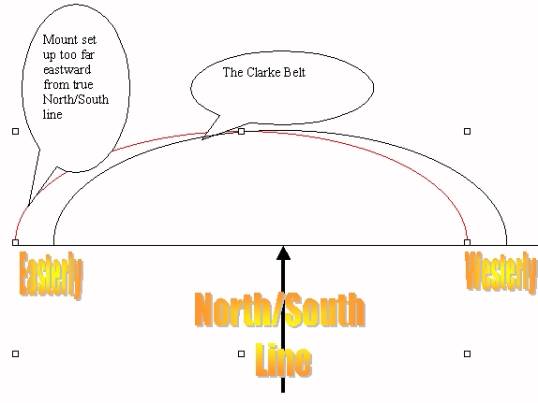
points along the north/south line with the motor/mount centralised.
If the entire unit is not aligned along the true north/south line then
no subsequent adjustment can ever put this right.
Recheck your antenna's aim after you have tightened the bolts.
How do you find the true north/south direction? Yes, you guessed it, the
http://susdesign.com/sunangle/
website will tell you the exact time of day when the sun will be due south
of your location.
3.
Setting the
elevation/declination.
If you refer back to the Satmaster Pro
result it showed the following Modified Polar Mount Settings.
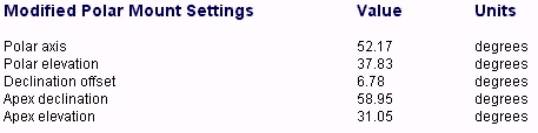
The two important values for us are the Polar elevation and Declination offset
values.
A diagram, copied from the Satmaster Pro download site, will
help explain what these two values refer to.
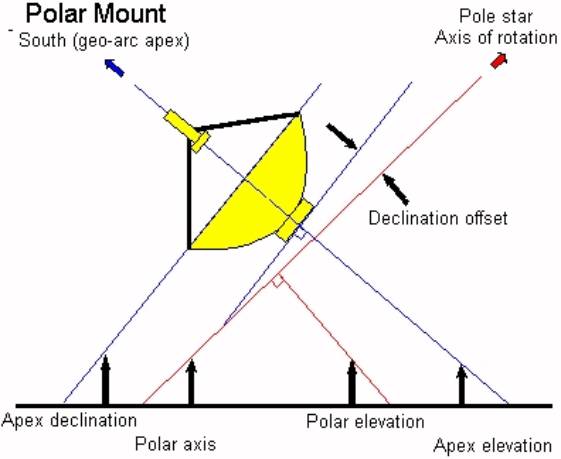
This diagram is, perhaps, a little confusing - especially if
you have an offset dish! Even if you have a centre fed dish, as shown in the
diagram, it all appears to be a little bit magical.
Let's try and simplify things a little.
The basic idea of the satellite dish mount is a variant of
an age-old invention stolen from astronomers.
They had a very similar problem to us when looking at the
stars through their telescopes. A fixed telescope mount was no good to them
for their star gazing, because as the earth turned, the star they were observing
would gradually slide out of the field of view of their telescopes. The stars,
in fact, appeared to move in an arc across the sky; rising in the east and
setting in the west. The shape of this arc is remarkably similar to the arc
of the Clarke belt across the sky. The only difference in the shape of the
arc is explained by the fact that the geostationary satellites are considerably
closer to us than the stars are!
Fitting a clockwork motor to the mount solved half of their
problem. The telescope could then be moved at exactly the same speed as the
earth turned. The motor itself was quite literally clockwork, that is, made
from a real clock, because the motor had to keep in perfect time with the
rotation of the earth.
The other half of their problem was solved with some cunning
geometry. By tilting the axis of their telescope mounting, it exactly matched
and complemented the latitude of their observatory.

This is all pretty clever stuff, ideal for astronomers. But
the geostationary satellites are only thousands of miles above us, whereas
the stars are millions of times further away. So the geometry involved is
not quite the same.
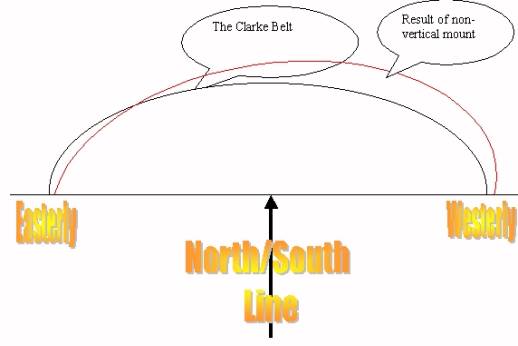
Because few of us live on the equator, most of us will need
to ensure that our dish does not look over the top of the arc where the satellites
are located, and we need to 'nod' the dish's line of sight downward a little.
This slight downward nod is called the declination angle and it varies with
our latitude.
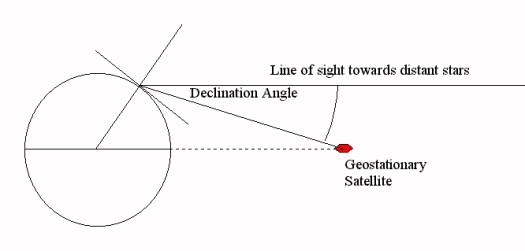
Unfortunately all of the satellites around the Clarke belt
are different distances away from us, so the amount of nod, or declination
angle, is going to be different for each satellite. Happily, Satmaster
Pro calculates 'modified polar mount setting angles', which largely compensate
for this last difficulty. The calculated modified elevation and declination
angles should allow your dish to track the Clarke Belt very acceptably, and
you will need to have a very big dish indeed to notice any imperfections in
the tracking of the arc.
This guide cannot explain how the elevation and declination
adjustments are performed for your particular antenna and mount/motor. All
mounts/motors should have a calibrated elevation scale, but the declination
angle of the dish itself can be much more problematic to find. Often you may
find that the scales are a little vague and not calibrated in fractions of
a degree. You may very well have to resort to trial and error to set the declination
angle correctly. Follow the instructions that came with your mount and hope
that they get you somewhere 'in the ballpark'.
Troubleshooting your set up.
I won't assume that the gods have smiled upon you and that
you have easily installed your antenna system and are smugly receiving signals
from several of the more powerful satellites. If you are one of these lucky
individuals then you can skip the rest of this section and go straight to
Tweaking your set up.
It's quite possible that you can't get anything at all, or
only get signals from a couple of satellites that are close to each other
in the sky. If this is the case then it is likely that you have made a major
alignment error of some kind, and your dish is nowhere near correctly set
up to track the Clarke belt.
In this case possible causes of error are
·
Getting your latitude and or longitude wrong, so
re-check your position using a different method.
·
Not having the mounting pole or bracket vertical - this
is really
essential.
·
Wrong setting of elevation and/or declination - this is
really difficult to do with an offset dish, as the direction that the dish is
actually looking is very difficult to imagine. If your dish manufacturer does
not quote an offsetting angle you have my deepest sympathies.
If, after multiple
attempts, you still can't get the damn thing to work, then try this method.
Throw the manufacturer's instructions away with great force
(it won't help - but it might make you feel better).
Select a powerful satellite that is nearest to being due
south (or if you are in the Southern Hemisphere, due north) of your location.
So if you were in London you would pick 1ºW, in Hamburg 10ºE,
or in Rome 13ºE etc. It doesn't matter too much if the satellite is not directly
due south or north of you, within a couple of degrees or so will be good enough
to get you in the 'ball park'.
Using the sun angle website find the time that the sun will
be due south (or north) of you.
Well before this time, set your mount or motor's elevation
to an angle value that is complementary to your own latitude. For example,
if your latitude is 52º then the complementary angle is 90-52 = 38 degrees.
If your latitude is 35º then the complementary angle is 90-35= 55 degrees.
Centralise your mount, i.e. set it so that it is halfway
between the east and west limits, or the calibrated scale on your mount reads
0, and loosen the mounting clamp.
Fix a piece of string from the lnb, to the top of the dish.
This will cast a shadow onto the dish face that we will use to aim our dish.
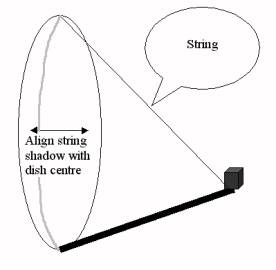
At the time predicted by the sun angle site, swivel the entire
assembly around the mounting pole so that the sun falls directly onto the
face of the dish, and the shadow cast by the string passes directly over the
dish centre. Tighten up the clamps.
We now have the direction to the satellite set to within
a couple of degrees, and the elevation has been set to a similar degree of
accuracy. There now is only one other adjustment left to make.
Taking your time, rock the dish declination angle adjustment
slowly up and down. Do not alter the mount's elevation setting.
If you are using a digital satellite receiver to detect the
signals, you must allow enough time for the receiver to lock up to the signal.
Be patient. If you have done everything right, you will get a signal
sooner or later. Peak the signal on the receiver's signal quality meter, and
tighten up the dish declination adjustment bolts.
Using the receiver's east-west adjustment facility peak the
signal.
Congratulations, you are now in the ballpark. Your dish is
now peaked on a satellite very near the centre of the Clarke belt, as seen
from your location, and should approximately track the rest of the arc.
<<-- PREVIOUS PAGE
NEXT PAGE -->>
© SatCritics 2003 All rights reserved
|